Quel résultat voulez-vous sur vos produits ?What result do you want on your products?
Choisissez d’abord le ciblageChoose targeting first
Ne choisissez pas encore un code. Commencez par le résultat commercial attendu.
Le même widget sur tous les produits
Idéal pour une campagne, une preuve sociale ou un guide commun à tout le catalogue.
2Un widget pour un produit précis
Idéal pour expliquer un produit, montrer une routine ou ajouter des avis dédiés.
3Un widget différent pour chaque produit
Idéal pour un catalogue où chaque produit possède son propre contenu Snackeet.
Do not choose code yet. Start with the commercial outcome you need.
The same widget on every product
Best for a campaign, social proof, or guidance shared across the catalog.
2One widget for one specific product
Best for product education, a routine, or reviews dedicated to one item.
3A different widget for every product
Best for a catalog where every product has its own Snackeet content.
Choisir Banner ou FloatingChoose Banner or Floating
Le ciblage et l’affichage sont deux décisions différentesTargeting and presentation are separate decisions
Après avoir choisi le cas produit, choisissez la façon dont le widget doit apparaître.
Dans le contenu du produit
Le Banner occupe de l’espace. Il apparaît exactement à la position de la section Liquid personnalisé.
Au-dessus de la page
Le Floating flotte au-dessus du produit. Sa position desktop/mobile se règle dans Snackeet.
After choosing the product case, choose how the widget should appear.
Inside product content
The Banner occupies space. It appears exactly where the Custom liquid section is placed.
Above the page
The Floating widget overlays the product. Configure its desktop/mobile position in Snackeet.
Avant de commencerBefore starting
Deux accès seulementOnly two things are required
- Le widget Banner ou Floating existe dans Snackeet et son statut est live.
- Vous pouvez ouvrir Shopify Admin → Online Store → Themes → Customize.
- The Banner or Floating widget exists in Snackeet and is live.
- You can open Shopify Admin → Online Store → Themes → Customize.
Récupérer le code depuis SnackeetGet the code from Snackeet
Widgets → Banner/Floating → Integration → Embed code
Le code généré contient déjà le code du projet et l’alias fixe du widget.
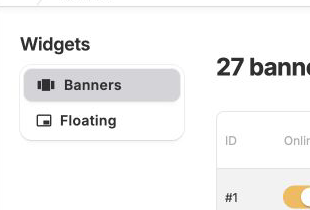
Dans Snackeet, ouvrez Widgets, puis choisissez Banners ou Floating.
Ouvrez le widget voulu, puis l’onglet Integration.
Pour les cas 1 et 2, copiez tout le bloc Embed code. Pour le cas 3, gardez aussi le projectId à portée de main.
Une ligne snktProjectId et une ligne snktDynamicAlias.
The generated code already contains the project code and the widget’s fixed alias.
In Snackeet, open Widgets, then choose Banners or Floating.
Open the required widget, then open Integration.
For Cases 1 and 2, copy the complete Embed code. For Case 3, also keep the projectId nearby.
One snktProjectId line and one snktDynamicAlias line.
 12
12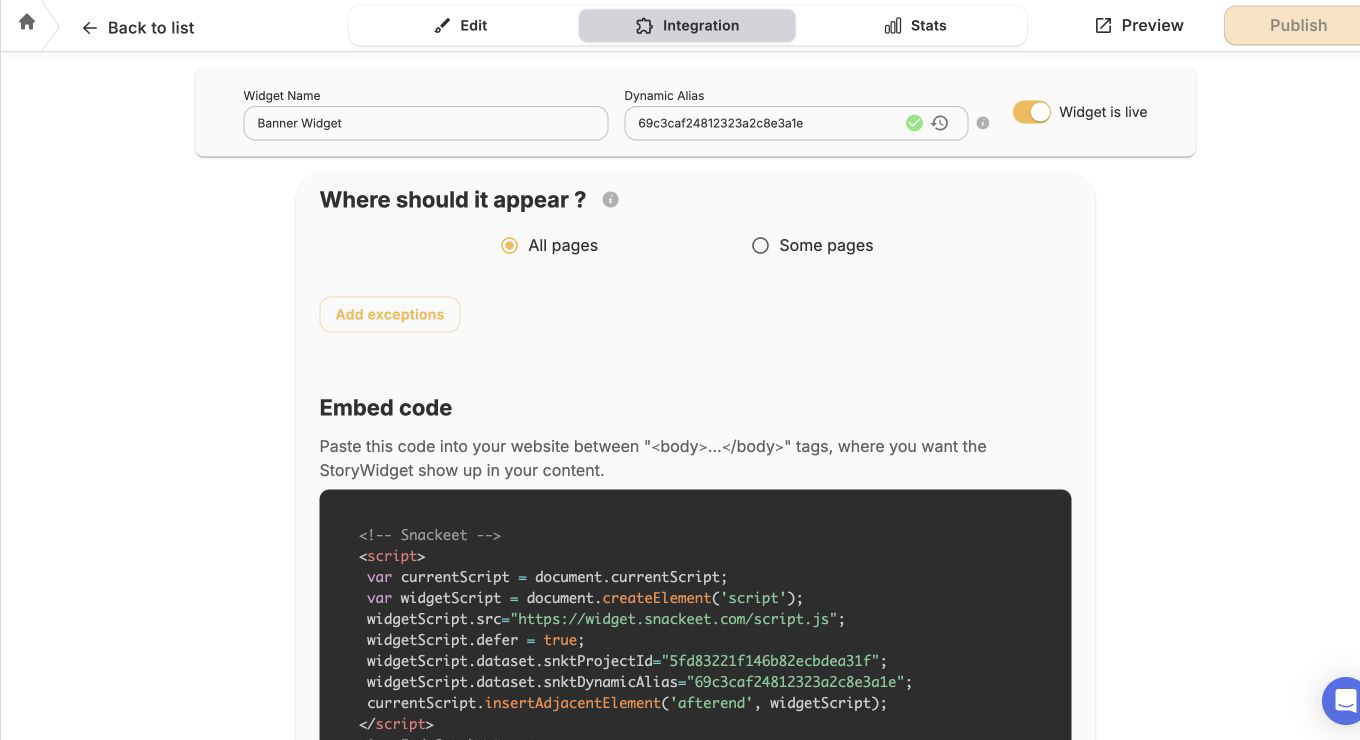 12
12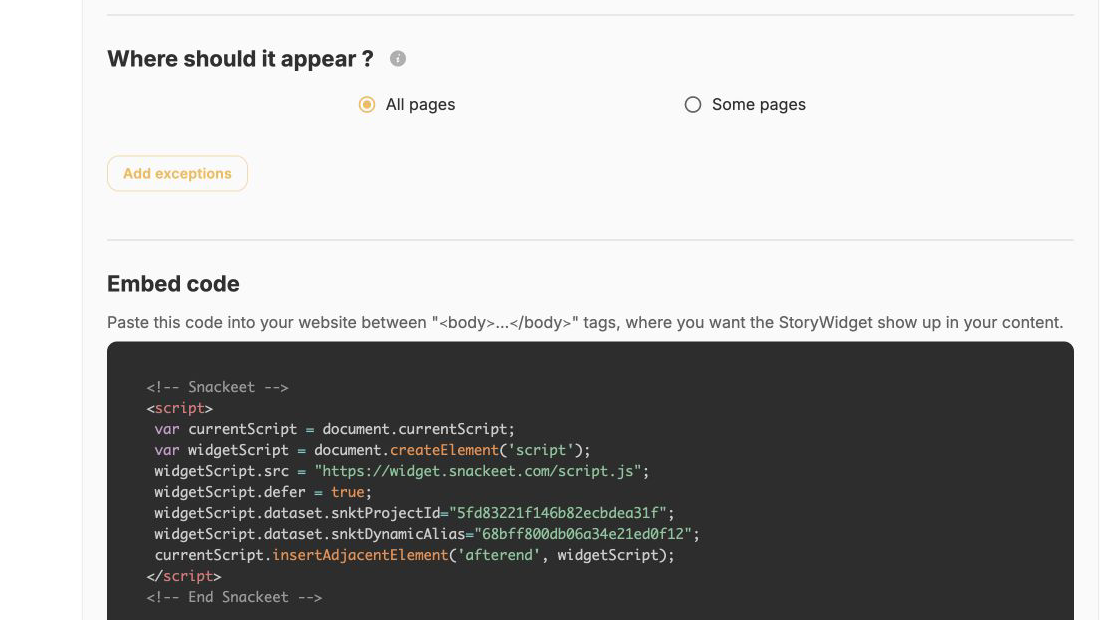
Comprendre les valeurs sans lire le codeUnderstand the values without reading code
projectId · fixed alias · Dynamic Alias · product.id
projectIdLe code de votre projet Snackeet. Plusieurs widgets du même projet peuvent le partager.
La valeur déjà présente dans le code généré. Gardez-la pour les cases 1 et 2.
La valeur utilisée par Snackeet pour choisir le widget correspondant à la page.
{{ product.id }}Une valeur Shopify qui devient automatiquement l’identifiant numérique du produit Shopify actuellement ouvert.
projectIdThe code of your Snackeet project. Several widgets in the same project can share it.
The value already present in generated code. Keep it for Cases 1 and 2.
The value Snackeet uses to choose the widget that belongs to the page.
{{ product.id }}A Shopify value that automatically becomes the numeric Shopify Product ID of the currently open product.
Ouvrir le bon modèle Produit ShopifyOpen the correct Shopify Product template
Online Store → Themes → Customize → Products
Le modèle choisi détermine quels produits recevront le code.
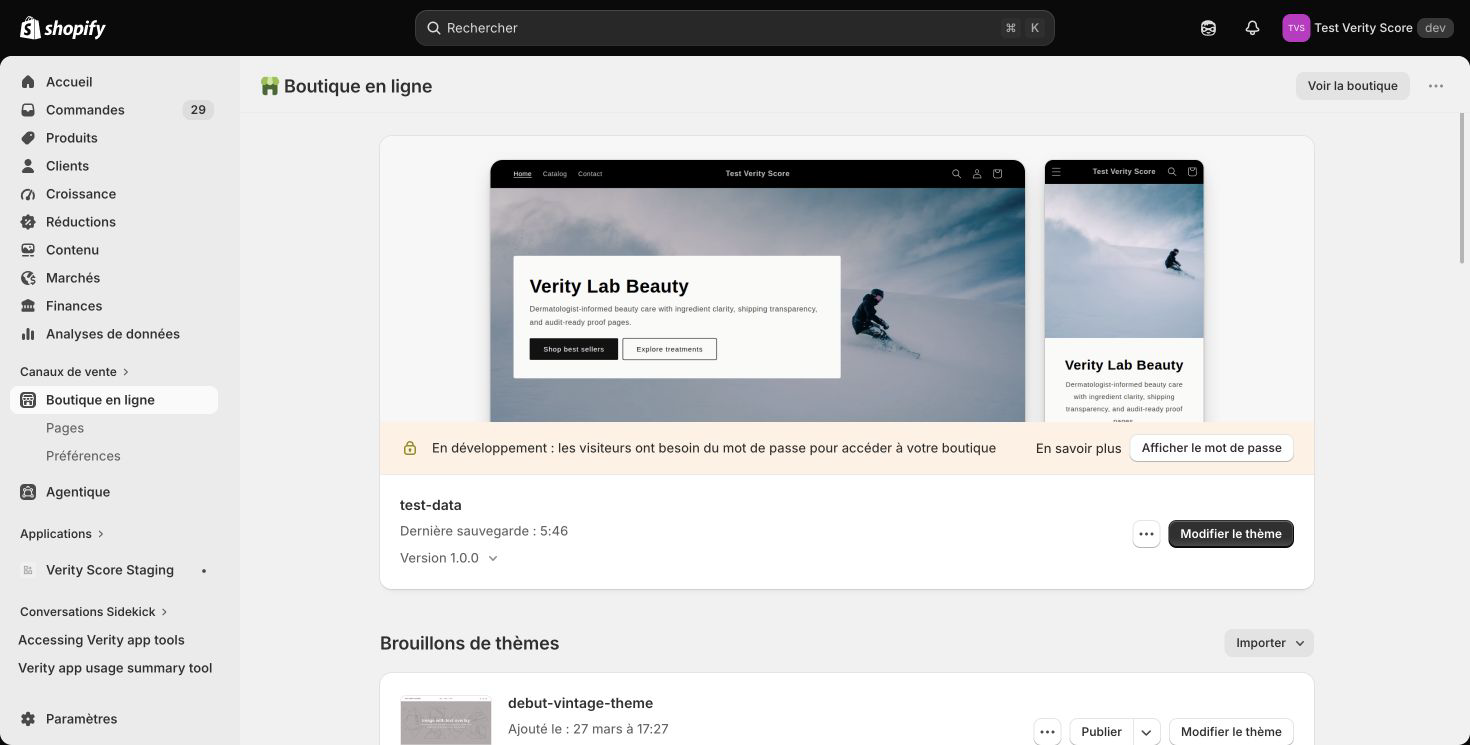
Shopify Admin → Online Store → Themes.
Cliquez sur Customize. En haut, choisissez Products, puis le modèle voulu.
Ajoutez une section Custom liquid / Liquid personnalisé à l’endroit où le code doit être chargé.
Le modèle Produit sélectionné en haut et la section Liquid personnalisé dans la colonne de gauche.
The selected template determines which products receive the code.
Shopify Admin → Online Store → Themes.
Click Customize. At the top, choose Products, then the required template.
Add a Custom liquid section where the code should load.
The selected Product template at the top and a Custom liquid section in the left panel.
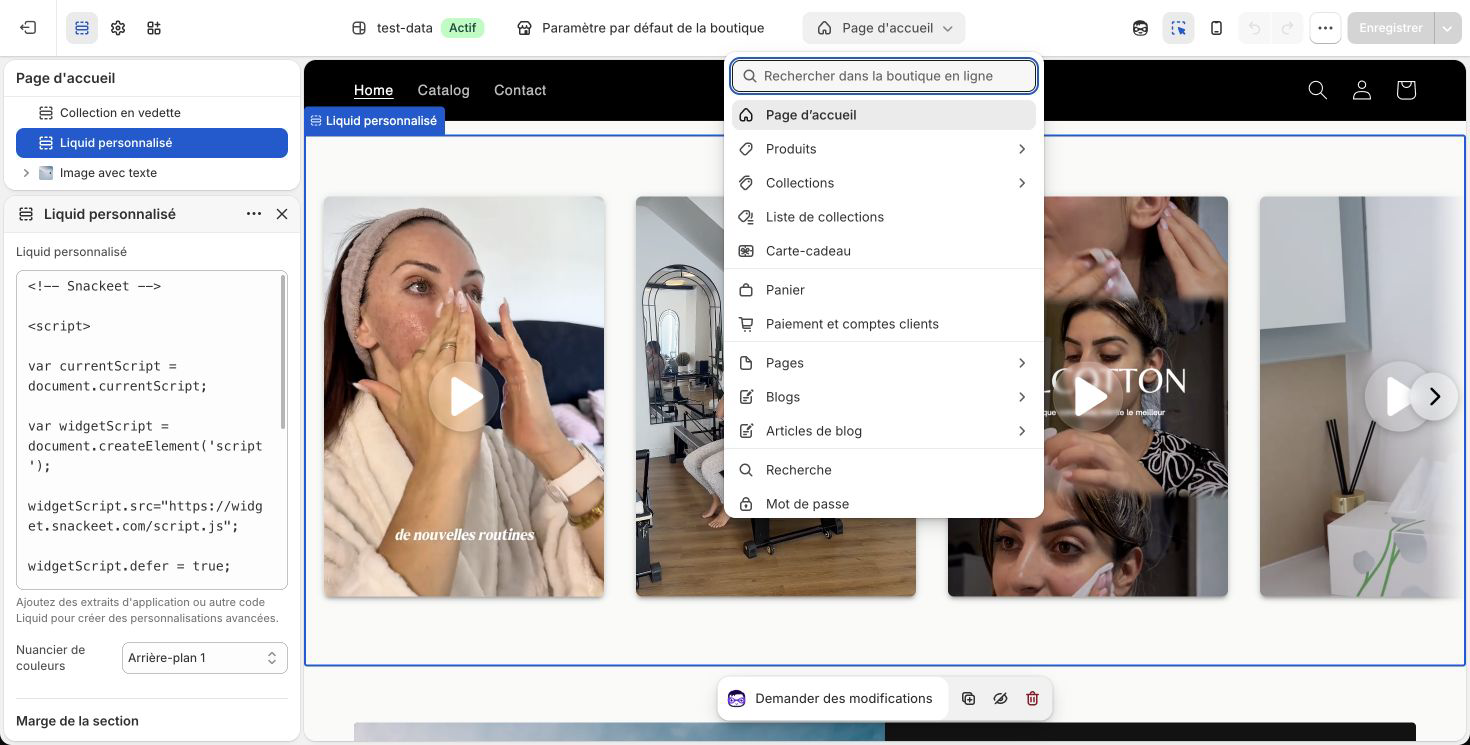
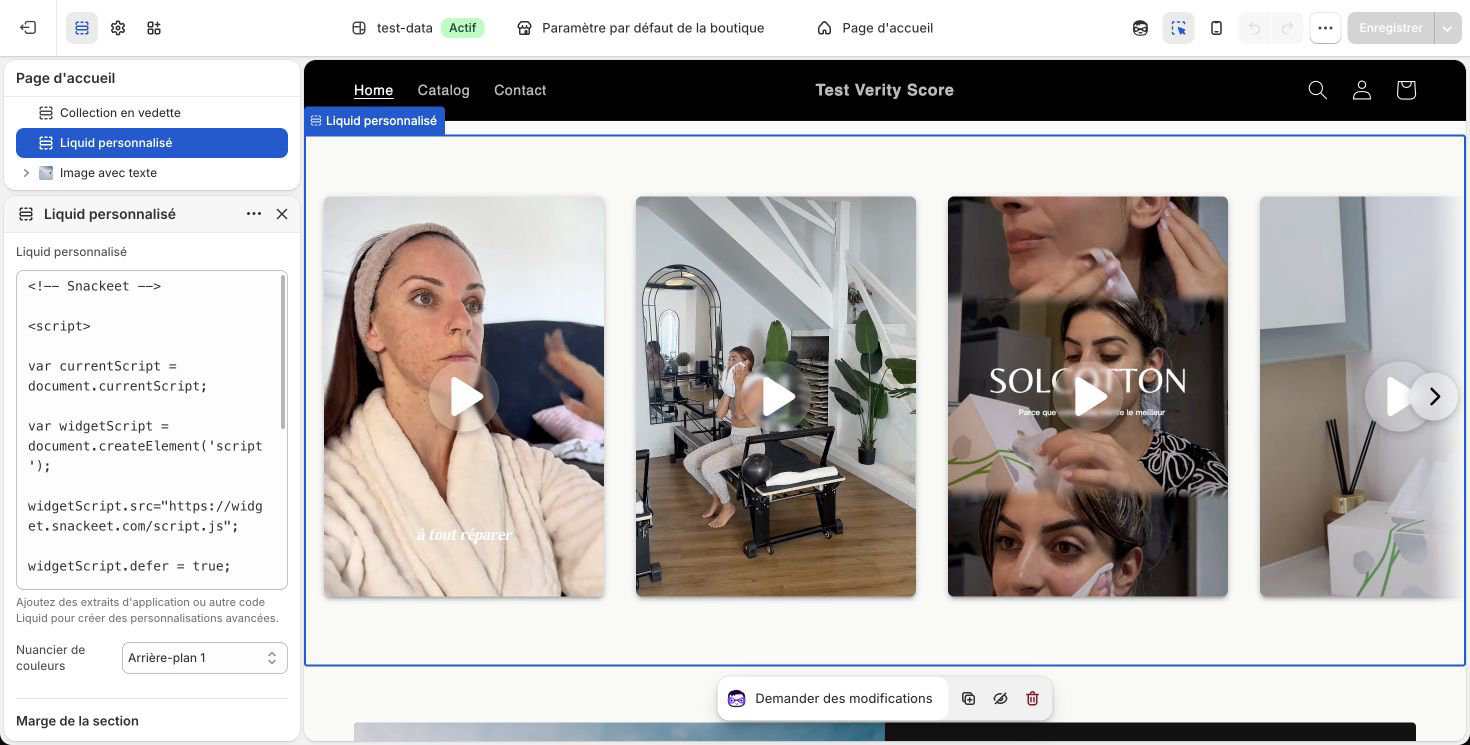
Cas 2 — Un widget pour un produit précisCase 2 — One widget for one specific product
Alias fixe · modèle Produit uniqueFixed alias · unique Product template
Choisissez ce cas pour une fiche produit qui mérite son propre contenu : démonstration, routine, tutoriel, avis ou Story shoppable.
Dans l’éditeur Shopify, créez ou sélectionnez un modèle Produit réservé à ce produit.
Shopify Admin → Products → ouvrez le produit → attribuez-lui ce modèle unique et vérifiez qu’aucun autre produit ne l’utilise.
Dans Liquid personnalisé, collez le bloc Embed code complet généré par Snackeet, sans modifier l’alias fixe.
Le widget apparaît uniquement sur le produit auquel le modèle unique est attribué.
Choose this case for a product page that needs its own demonstration, routine, tutorial, reviews, or shoppable Story.
In the Shopify editor, create or select a Product template reserved for this product.
Shopify Admin → Products → open the product → assign this unique template and confirm that no other product uses it.
In Custom liquid, paste the complete Embed code generated by Snackeet without changing the fixed alias.
The widget appears only on the product assigned to the unique template.
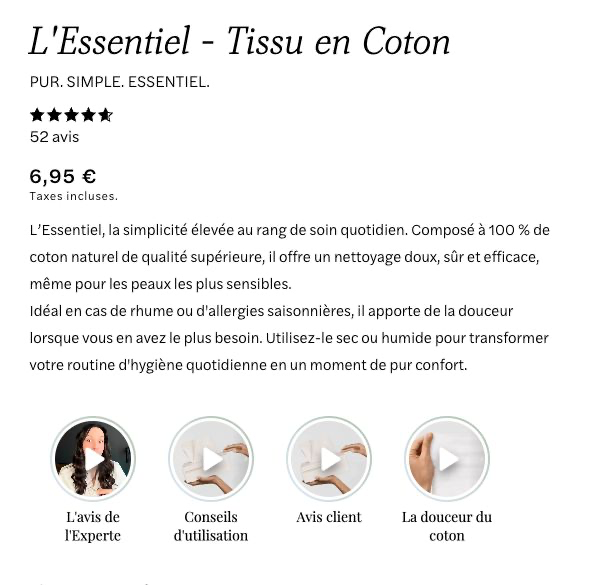
Cas 3 — Un widget différent pour chaque produitCase 3 — A different widget for every product
Product ID automatique · un seul modèle partagéAutomatic Product ID · one shared template
Choisissez ce cas pour gérer un catalogue à grande échelle avec un seul modèle Produit.
Shopify Admin → Products → ouvrez le produit que vous voulez associer à un widget.
Dans l’URL Shopify Admin, copiez le nombre situé après /products/. C’est l’identifiant numérique du produit Shopify.
Dans Snackeet, ouvrez le widget correspondant et collez ce nombre dans son champ Dynamic Alias. Dans Shopify, collez ensuite l’un des modèles de code complets ci-dessous.
Chaque page produit affiche automatiquement le widget Snackeet dont l’alias est égal à son Product ID.
/products/example-product contient un handle lisible, pas l’identifiant numérique.Choose this case to manage a large catalog with one shared Product template.
Shopify Admin → Products → open the product you want to match with a widget.
In the Shopify Admin URL, copy the number after /products/. This is the numeric Shopify Product ID.
In Snackeet, open the matching widget and paste this number into its Dynamic Alias field. In Shopify, then paste one of the complete code templates below.
Each product page automatically displays the Snackeet widget whose alias equals its Product ID.
/products/example-product contains a readable handle, not the numeric ID.{{ product.id }}{{ product.id }} tel quel.Dynamic Banner: in the code below, replace only the uppercase text with your projectId. Keep {{ product.id }} unchanged.<!-- Snackeet Banner Widget -->
<script>
var currentScript = document.currentScript;
var widgetScript = document.createElement('script');
widgetScript.src = "https://widget.snackeet.com/script.js";
widgetScript.defer = true;
widgetScript.dataset.snktProjectId = "PASTE_PROJECT_ID_FROM_SNACKEET";
widgetScript.dataset.snktDynamicAlias = "{{ product.id }}";
currentScript.insertAdjacentElement('afterend', widgetScript);
</script>
<!-- End Snackeet -->{{ product.id }} est toujours présent.After pasting: the project placeholder is gone, but {{ product.id }} is still present.{{ product.id }} tel quel.Dynamic Floating: in the code below, replace only the uppercase text with your projectId. Keep {{ product.id }} unchanged.<!-- Snackeet Floating Widget -->
<script>
var currentScript = document.currentScript;
var widgetScript = document.createElement('script');
widgetScript.src = "https://widget.snackeet.com/script.js";
widgetScript.defer = true;
widgetScript.dataset.snktProjectId = "PASTE_PROJECT_ID_FROM_SNACKEET";
widgetScript.dataset.snktDynamicAlias = "{{ product.id }}";
currentScript.insertAdjacentElement('afterend', widgetScript);
</script>
<!-- End Snackeet -->projectId. Leurs alias les distinguent. Installez et testez chaque integration séparément.Multiple widgets on one page: a Banner and Floating widget can share the same projectId. Their aliases distinguish them. Install and test each integration separately.Vérifier sur un vrai produitVerify on a real product
Desktop · mobile · bon produitDesktop · mobile · correct product
Ouvrez Shopify Preview sur un produit réel qui utilise le modèle configuré.
Testez l’aperçu desktop puis mobile. Ouvrez aussi une Story pour confirmer l’interaction.
Cas 1 : même widget partout. Cas 2 : widget uniquement sur le produit ciblé. Cas 3 : widget correspondant au Product ID.
Le bon Banner à la bonne place ou le bon Floating à la position réglée dans Snackeet.
- Le widget est live dans Snackeet.
- Le bon modèle Produit est attribué.
- Le
projectIdvient du bon projet. - Pour le cas 3, le Dynamic Alias Snackeet est exactement le Product ID Shopify.
Open Shopify Preview on a real product that uses the configured template.
Test desktop and mobile preview. Also open a Story to confirm the interaction.
Case 1: same widget everywhere. Case 2: widget only on the intended product. Case 3: widget matching the Product ID.
The right Banner in the right place or the right Floating widget at the position configured in Snackeet.
- The widget is live in Snackeet.
- The correct Product template is assigned.
- The
projectIdcomes from the correct project. - For Case 3, the Snackeet Dynamic Alias exactly matches the Shopify Product ID.
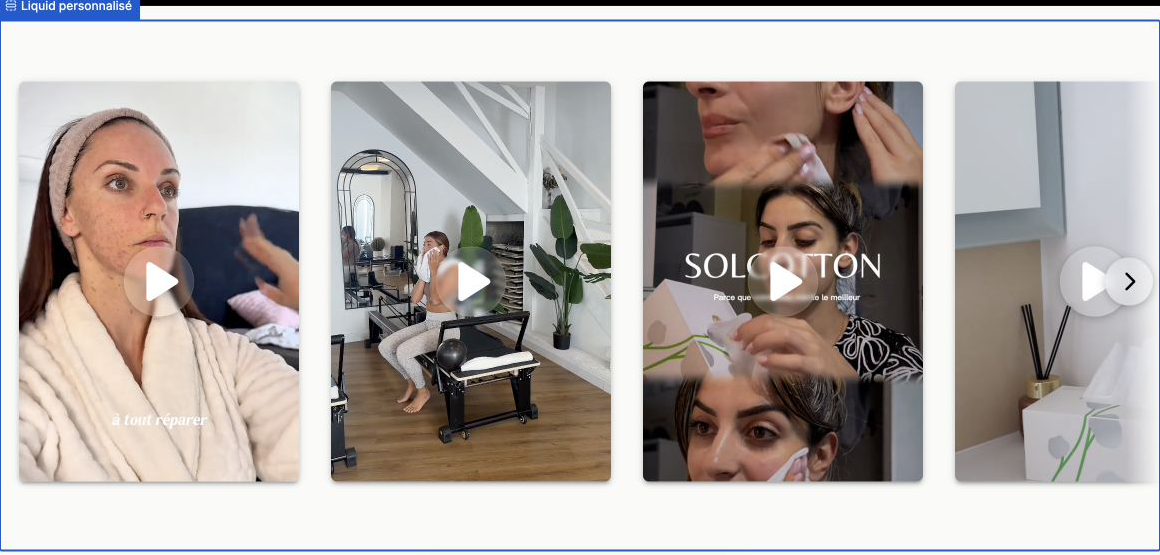
Corriger un problème e-commerceFix an ecommerce issue
Ce que vous voyez · ce qu’il faut faireWhat you see · what to do
| Ce que vous voyez | Ce qu’il faut faire |
|---|---|
| Le même widget apparaît partout, mais vous vouliez un widget différent | Vous utilisez encore un alias fixe. Passez au cas 3 et gardez {{ product.id }}. |
| Aucun widget sur un produit dans le cas dynamique | Vérifiez que le widget est live et que son Dynamic Alias est exactement le Product ID Shopify. |
| Le widget d’un produit apparaît sur plusieurs produits | Le code est dans un modèle partagé. Créez un modèle unique et attribuez-le uniquement au produit ciblé. |
| Vous avez copié l’URL publique comme alias | Remplacez le handle par le Product ID numérique visible dans l’URL Shopify Admin. |
| Banner au mauvais endroit | Déplacez la section Liquid personnalisé dans le modèle Produit. |
| Floating au mauvais endroit | Changez sa position desktop/mobile dans Snackeet. |
| Banner fonctionne, Floating non | Vérifiez séparément le code, le statut live et l’alias de chaque integration. |
| What you see | What to do |
|---|---|
| The same widget appears everywhere, but you expected different widgets | You are still using a fixed alias. Switch to Case 3 and keep {{ product.id }}. |
| No widget appears on one product in the dynamic case | Check that the widget is live and its Dynamic Alias exactly matches the Shopify Product ID. |
| A product-specific widget appears on several products | The code is in a shared template. Create a unique template and assign it only to the intended product. |
| You copied the public URL as the alias | Replace the handle with the numeric Product ID shown in the Shopify Admin URL. |
| Banner is in the wrong place | Move the Custom liquid section in the Product template. |
| Floating widget is in the wrong place | Change its desktop/mobile position in Snackeet. |
| Banner works, Floating does not | Verify each integration’s code, live status, and alias separately. |
Autres pages e-commerceOther ecommerce pages
Après les pages produitAfter product pages
Utilisez ces valeurs uniquement si vous devez cibler d’autres types de pages. La valeur envoyée par Shopify doit correspondre exactement au Dynamic Alias Snackeet.
| Page | Valeur Shopify | Exemple d’usage |
|---|---|---|
| Accueil | home | Une campagne générale |
| Collection | {{ collection.id }} | Un widget par catégorie |
| Page standard | {{ page.id }} | Guide, landing page, FAQ |
| Article | {{ article.id }} | Story liée à un contenu éditorial |
Use these values only when targeting other page types. The value sent by Shopify must exactly match the Snackeet Dynamic Alias.
| Page | Shopify value | Example use |
|---|---|---|
| Homepage | home | A general campaign |
| Collection | {{ collection.id }} | One widget per category |
| Standard page | {{ page.id }} | Guide, landing page, FAQ |
| Article | {{ article.id }} | A Story linked to editorial content |
Facultatif : importer les produits dans SnackeetOptional: import products into Snackeet
Sans rapport avec l’affichage du widgetSeparate from displaying the widget
Ignorez cette annexe si vous voulez seulement afficher un Banner ou un Floating. Cette connexion sert uniquement à récupérer vos produits Shopify dans Snackeet.
- Shopify → Settings → Apps and sales channels → Develop apps.
- Créez une application pour cette boutique.
- Dans l’Admin API, autorisez uniquement
read_products. - Installez l’application et copiez le domaine permanent
votre-boutique.myshopify.com. - Récupérez le Client ID et le Client Secret.
- Dans Snackeet, ouvrez la connexion Shopify, saisissez ces informations, puis lancez l’import.
read_productsSkip this appendix if you only want to display a Banner or Floating widget. This connection is used only to retrieve Shopify products inside Snackeet.
- Shopify → Settings → Apps and sales channels → Develop apps.
- Create an app for this store.
- In the Admin API, grant only
read_products. - Install the app and copy the permanent domain
your-store.myshopify.com. - Retrieve the Client ID and Client Secret.
- In Snackeet, open the Shopify connection, enter these details, then start the import.
read_productsFacultatif : tracking e-commerceOptional: ecommerce tracking
Customer events · Custom pixel
Cette étape mesure les actions e-commerce. Elle n’est pas nécessaire pour afficher un widget.
- Snackeet → Analytics → configuration du tracking Shopify.
- Copiez le script généré pour ce projet.
- Shopify → Settings → Customer events.
- Ajoutez un custom pixel, collez le script, puis cliquez sur Save et Connect.
- Testez un ajout au panier et une commande de test.
| Événement | Ce qu’il mesure |
|---|---|
product_added_to_cart | Un produit a été ajouté au panier. |
checkout_completed | Le checkout Shopify a été terminé. |
This step measures ecommerce actions. It is not required to display a widget.
- Snackeet → Analytics → Shopify tracking setup.
- Copy the script generated for this project.
- Shopify → Settings → Customer events.
- Add a custom pixel, paste the script, then click Save and Connect.
- Test an add-to-cart action and a test order.
| Event | What it measures |
|---|---|
product_added_to_cart | A product was added to the cart. |
checkout_completed | The Shopify checkout was completed. |